Create events to mark points in time (which TimeStory calls point events) or timespans, tasks, or durations (which TimeStory calls span events). You can place them graphically, with point and click; you can type them in, using Quick Entry; you can import them from external sources; you can automatically add them via Shortcuts or AppleScript; and you can edit and manipulate them in a variety of ways.
Basic Event Editing
Adding a New Event to Your Timeline
Click the Span  or Point
  buttons on the toolbar, or use or from the menu, to instantiate a new event. A new “floating” event will appear on the timeline, and as you move your pointer around, it will follow you; click to place it.
Alternatively, right-click or Control+click anywhere on the document background and choose New Span Event or New Point Event to place an event at that location.
Once an event has been placed, you can grab it and drag it around with your pointer, or, for span events, you can freely drag its start or end date independently. Double-click an event to start editing its title in place.
Deleting an Event
You can delete a selected event using one of the following methods:
- the Delete option in the event’s context menu To reveal the context menu for a selected event: right–click using a mouse or trackpad, or control–click by holding the keyboard Control key and clicking the mouse or trackpad.
- If using an external keyboard, the Delete key on the keyboard
Using the Inspector to Edit Events
With one or more events selected, open the Inspector for another way to adjust its title or dates, or to tune its graphical presentation, color, font, size, and more. You can standardize event styles using defaults and copy-style/paste-style, and events can also have attached images, tags, and links.
Using Keyboard to Adjust Event Position on Your Timeline
On your keyboard, you can use ↑ or ↓ to move selected events up or down by one row, ← or → to move them earlier or later by one day, ⌘← or ⌘→ to move them earlier or later by the smallest time unit in your current timeline configuration. Press Return to start editing the title, as if you’d double-clicked.
Span Event Graphic Style and Title Placement
Span events are represented by a bar or line on the timeline. TimeStory offers several options for marking span events; adjust them in the Event Inspector, under Graphic Style.
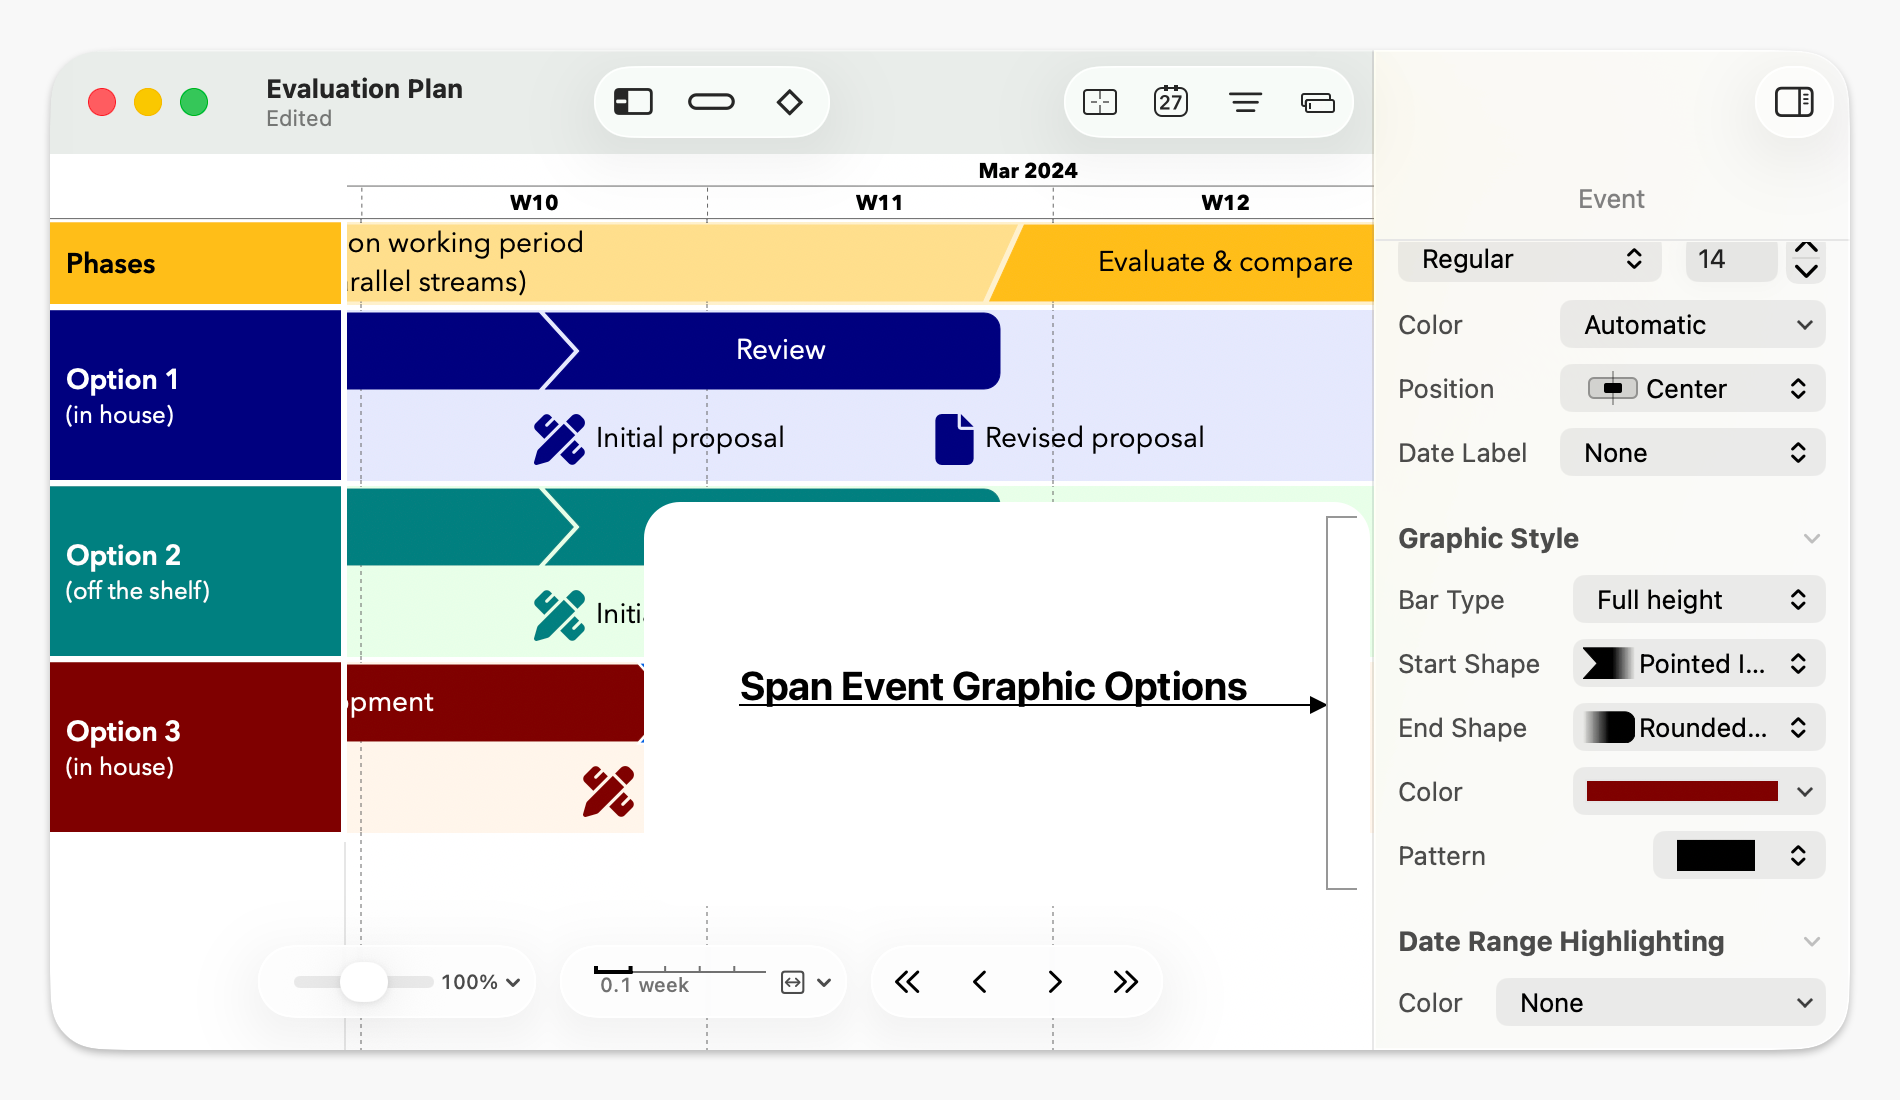
- Bar Type lets you choose between full height, line above, and line below. In the above example, Event 3 is set to line-above, and the other two are full-height.
- For full-height events, you can individually choose Start Shape and End Shape, each of which offer square corners, rounded corners, arrow shapes, jagged edges, and more.
- Color sets the color of the event bar.
- Pattern defaults to Solid, which fills the entire event shape, but can be set to one of a few striped patterns to call attention to an event, mark it as tentative, or otherwise set it apart.
Under Title Text, you can also choose each event’s title placement. Span-event titles can be placed before or after the bar, or within it, either left-aligned, centered, or right-aligned. Text placed inside an event can spill out horizontally in the direction of flow, and text with multiple lines can flow down the page, but will be cut off if there’s another event, section header, or other item in its way.
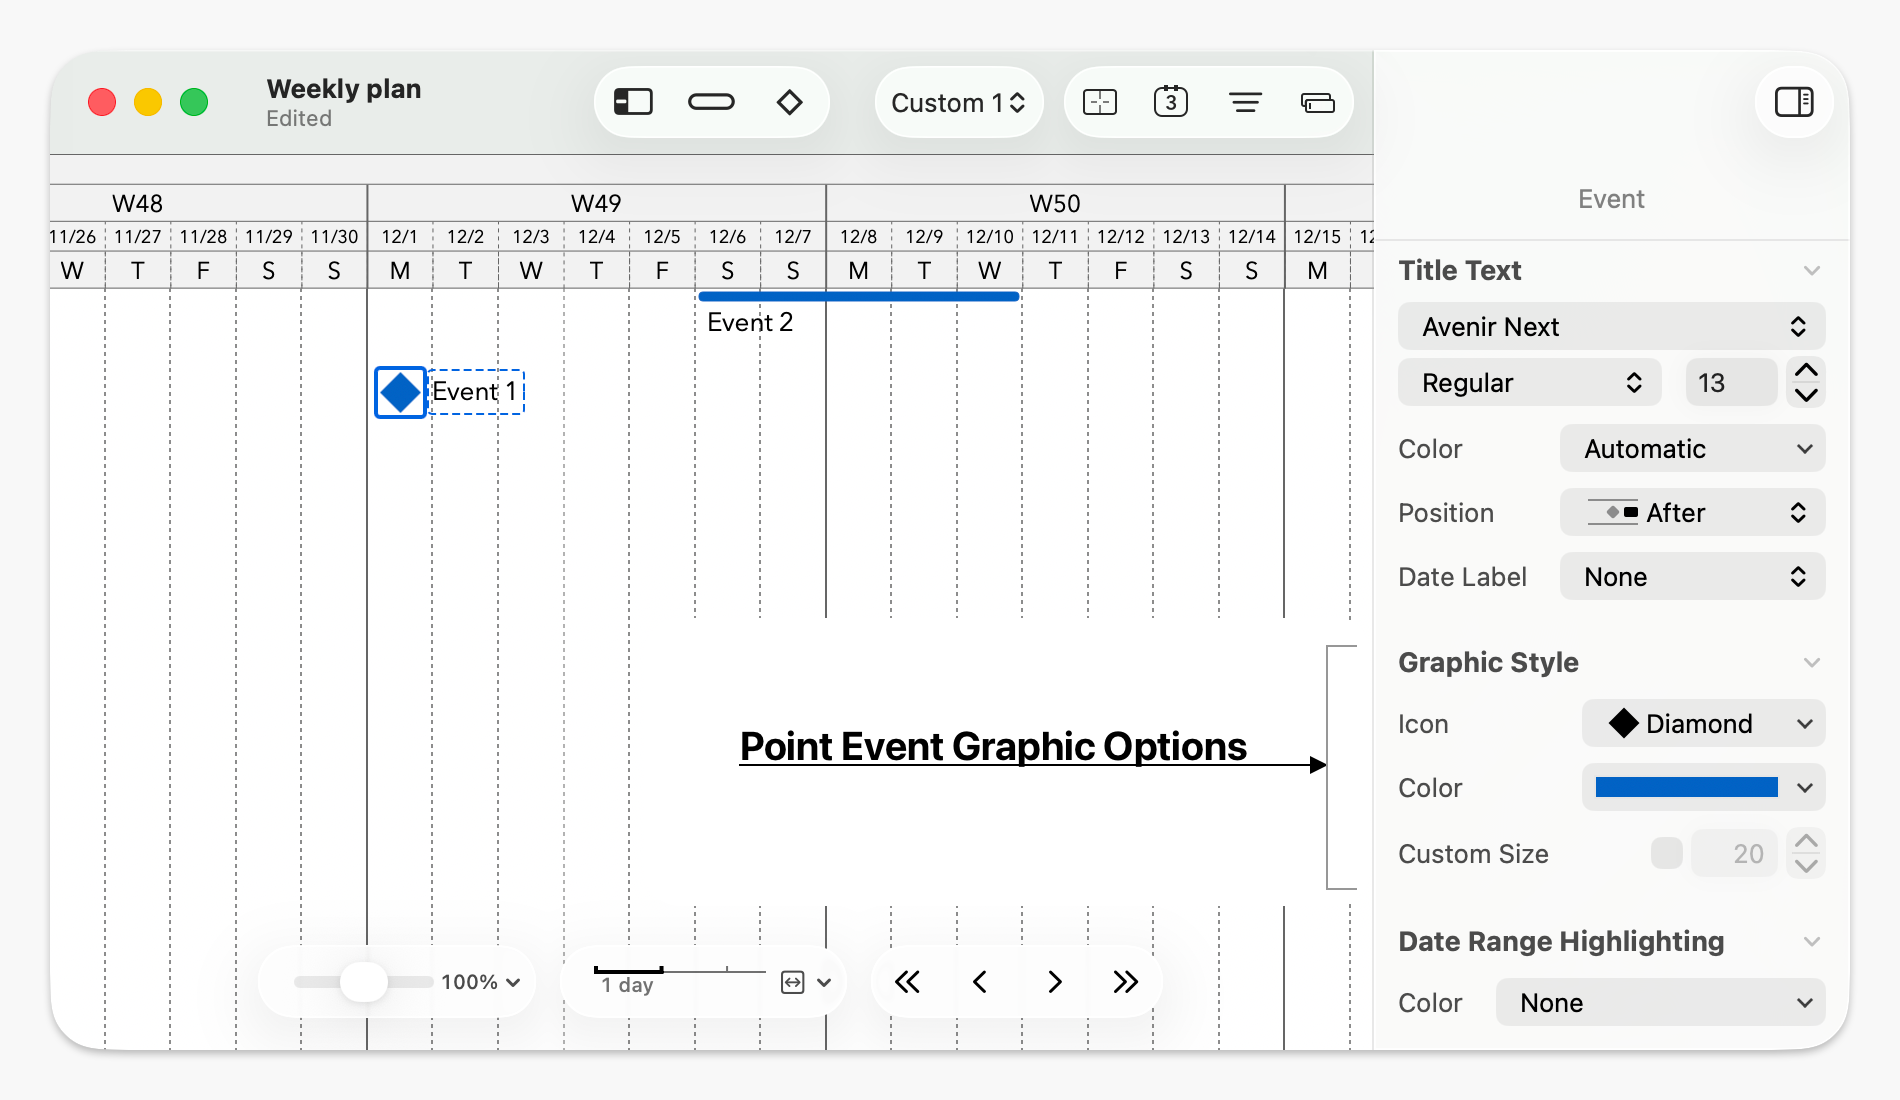
Point-Event Graphic Style and Title Placement
Point events are marked by an icon plus a title. The icon can be freely chosen from a set of built-in icons, or you can use your own; see Customizing Event Icons for more. The title may be placed before or after the icon. By default, all point event icons in a document have the same size, which you can change in the Document Inspector, but you can adjust individual events’ icon sizes as well if you want some of them to be larger or smaller.
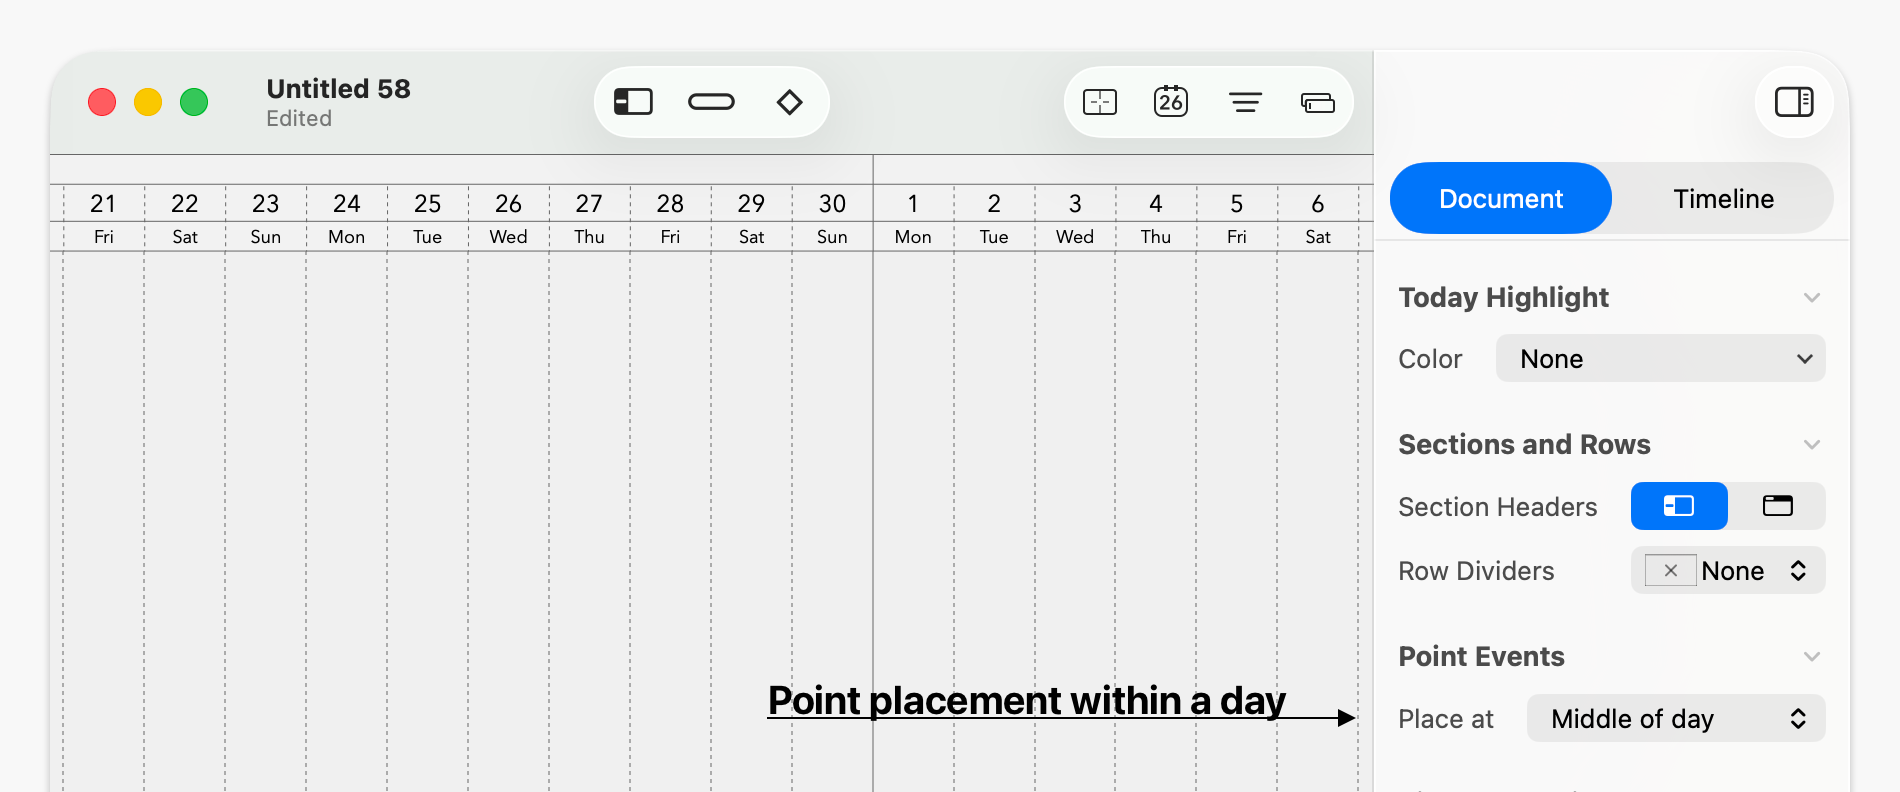
Position of Point Events Within a Day
Note that a point event always refers to a specific date. In TimeStory, by default, this means that the point is placed in the horizontal center of that day’s space on the timeline; you can think of this as representing midday.
In the Document Inspector, you can switch this to place the point events instead at the left edge of that day’s space, which you can think of as representing midnight. (This was the default behavior prior to TimeStory 3.0; if you have a document created in an older version, this value will reflect that, and you’ll need to switch it to center placement if you’d like.)
Multi-line Event Titles and Titles with Dates
If you want a title with multiple lines of text, press Option+Return while editing to insert a line break. (If your text flows downward into the next row, and another event interrupts it, it will be cut off with an ellipsis.)
In the Inspector, under Title Text, you can also choose a Date Label format. This asks TimeStory to insert another, smaller line of text to your title, containing its date range in the requested format. This can add clarity to a timeline where the timeline’s header isn’t fine-grained enough to easily spot event date ranges.
Events which Track Today’s Date
You can create a point event which always stays on today’s date, or a span event which always ends on today’s date, using the special date formula =today. You can enter this in place of the corresponding date in the Inspector, in Quick Entry, or even in a CSV file you’re importing.
(Make sure to include the equals sign, and to spell it exactly as shown; unlike other date values, it’s not translated to your system language.)
Copying, Pasting, and Duplicating Events
Events can be copied, pasted, and duplicated, using the normal menu items under the Edit menu or with the standard keyboard shortcuts.
When pasting one or more events, they follow the usual event-placement rules, including avoiding span overlap.
Duplicate and Drag
Hold the Option key when starting to drag an event, and a copy will automatically be made; you’ll be dragging that copy instead of the original. (You don’t need to keep holding the Option key after the drag starts.)
If you press Esc while dragging, the new event will be discarded.
Snapping to Dates While Dragging
When placing, dragging, or resizing an event, horizontal dragging snaps to gridlines as you get close to them. Any gridlines enabled in your timeline configuration will be used, so you might have both year-level and month-level snapping in effect, for example. If you have all vertical gridlines disabled, no snapping will occur.
While dragging an event, or just its start date, its start will snap to the start of that time unit (e.g., the first day of the month, or the first weekday); while dragging its end date, that end date will snap to the end of that time unit.
You can disable this snapping behavior by pressing and holding the Command key while dragging, allowing you to smoothly drag to any date.
Event Overlaps
TimeStory tries to avoid allowing span events to overlap in the same row. If you try to drag or place one span event such that it overlaps with another, it will insert a new, empty row for your event instead. (Point events may be freely placed atop span events, to mark milestones within a task, for example.)
This default event layout behavior can be overridden or forced.
To prevent the default behavior, hold down Shift while placing or dragging events; this will allow any overlaps of any kind.
To force overlap on the same row, hold down both Option and Shift while placing or dragging events; even when there isn’t any overlap, or when dragging a point event, your event will be kept on its own, new row.
Automatic Event Arrangement
TimeStory can automatically move your events vertically to achieve a clean look, either compacting them into as few rows as possible or arranging them in a waterfall so that earlier events are placed towards the top and later events are placed towards the bottom. (After arranging events, you can of course manually move them around into other layouts, or perform another arrangement again.)
Use to open the Arrange Events dialog.
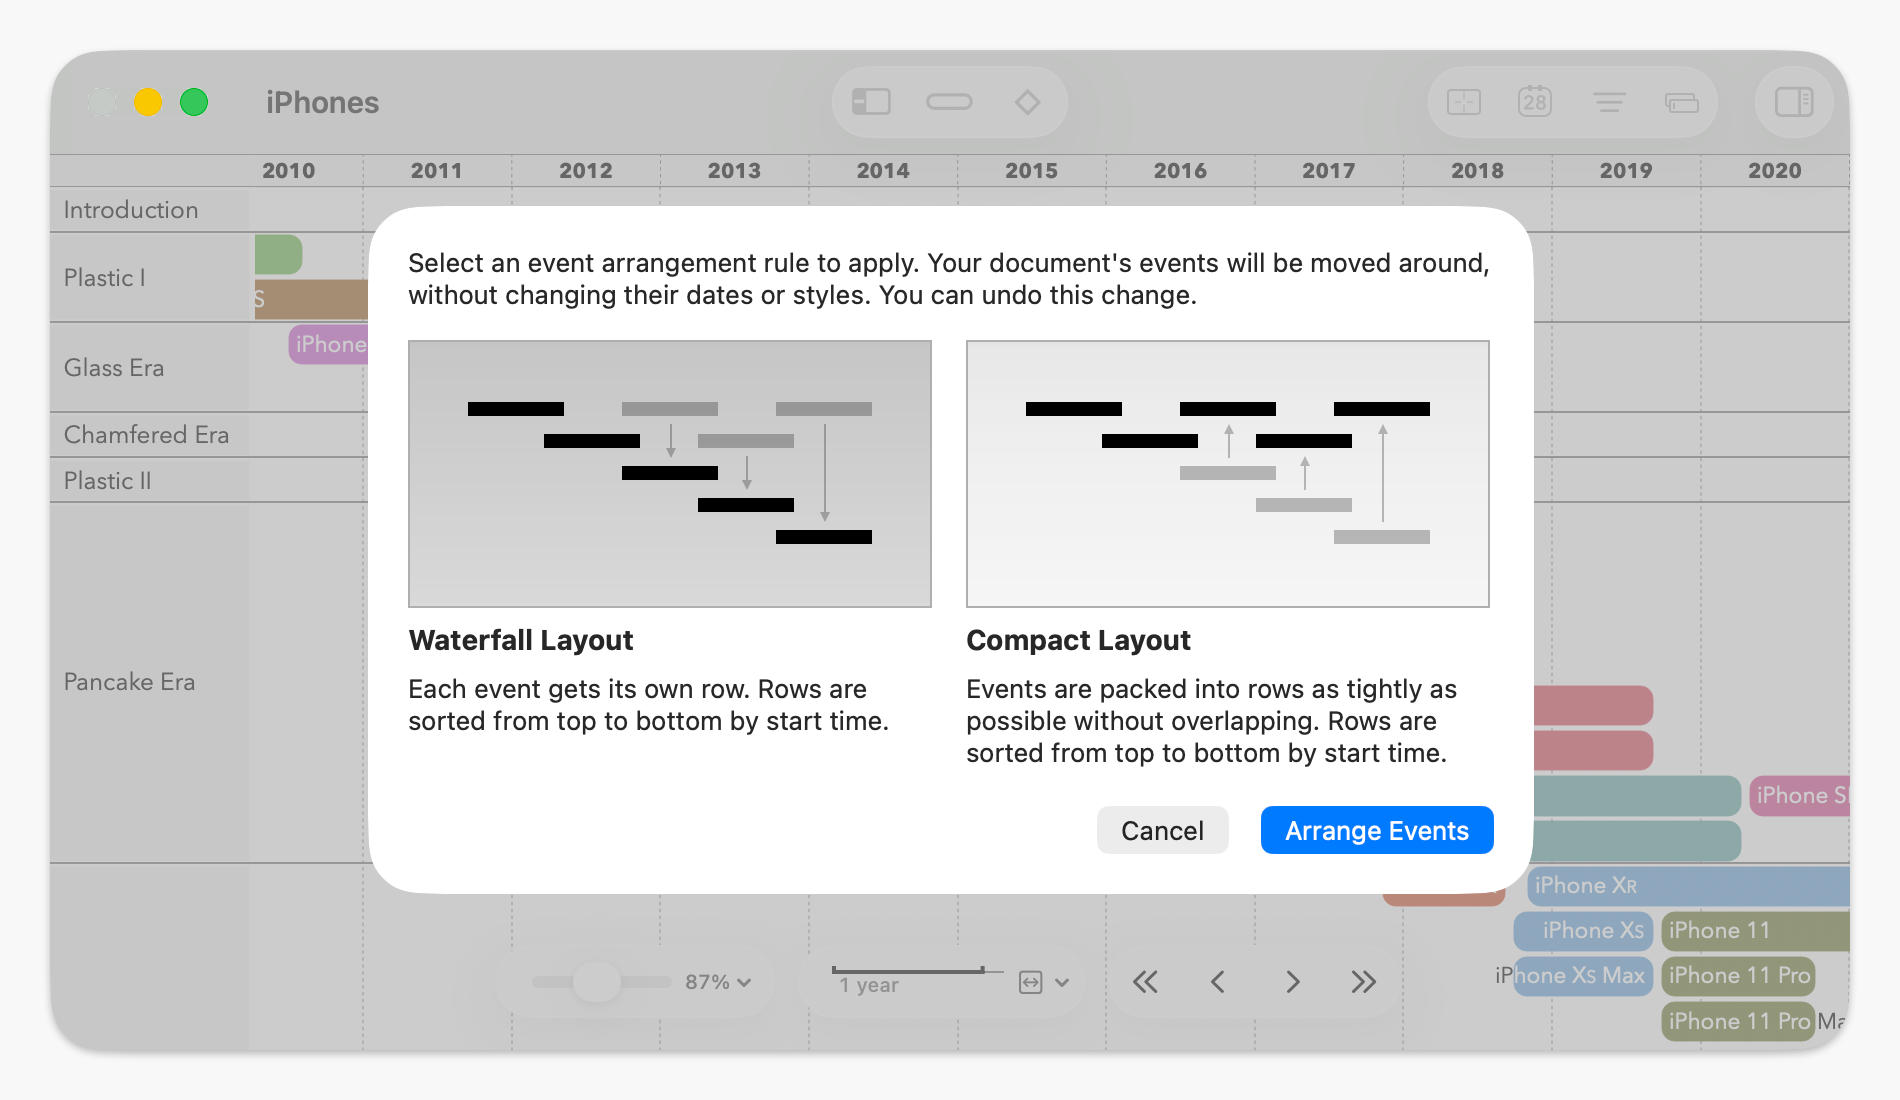
Note that event arrangement does not rearrange sections; events are moved around only within their containing sections.
Merging Span Events
Suppose you have two (or more) tasks in your plan which you’ve realized would be easier to manage as one. You can combine them using the merge feature. Select two or more span events to be merged, then use Merge on the context menu (or on the main menu). If your document uses sections, the selected events must all be in the same section; the merged event remains there.
Merge will replace all selected events with a single merged event, which has:
- A start date, start shape, title, description, and most other properties equal to those of the earliest event selected;
- An end date and end shape equal to that of the latest event selected.